Do this with the instrument in your hands. Everything below takes about ten minutes and by the end you will have used both halves of the app.
1. The home screen
Open the app and it turns your phone on its side. Five buttons:
| Button | Where it goes |
|---|---|
| The one named after your instrument | The fretboard page. “Guitar” to start with |
| ”Switch Instrument” | The list of stringed instruments |
| ”Piano” | The keyboard page |
| ”Combo” | Keyboard and fretboard together, in the full version |
| ”Chord Charts” | The chord chart editor |
Tap the first one.
2. Press four notes
You are looking at a fretboard. The circles down the left, before the nut, are your six strings; a red cross means the string is not played.
Tap a fret and the note lights up and sounds. Tap the same fret again to take it off. Tap a circle at the nut to sound that string open, and again to mute it.
Put down a shape you actually play. Four notes is plenty.
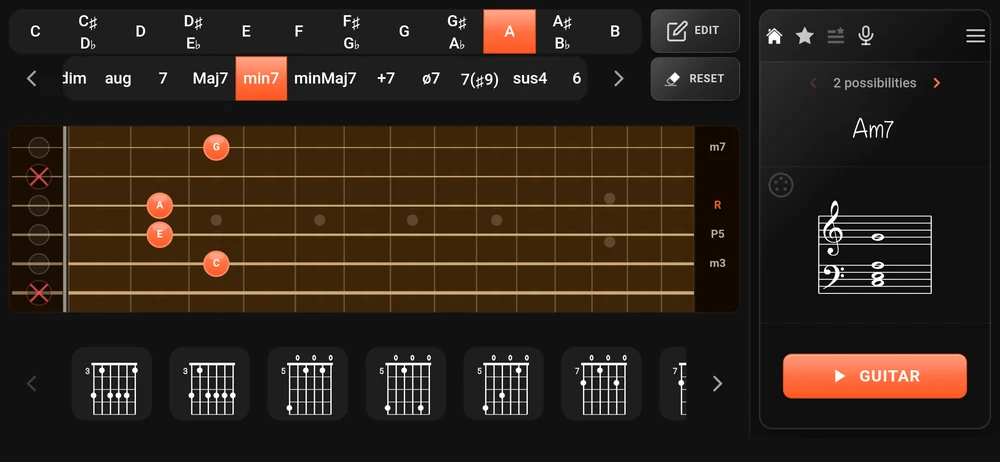
Three things happened on the right:
- the chord name appeared;
- above it, a count such as “2 possibilities” with arrows, because those four notes can be read as more than one chord;
- the notes landed on a staff, treble and bass.
And to the right of the fretboard, a narrow column named the degree each string is playing: R for the root, then things like m3 and m7.
3. Hear it
The orange button at the bottom right carries the name of your instrument. Tap it and the app plays the notes on screen with a sampled instrument, so you can check the app heard you correctly before you tell anyone the name.
4. Now the other direction
Tap “RESET” to clear the neck.
Along the top are two rows: the twelve roots, then the qualities, starting Maj, min, dim, aug, 7, Maj7, min7. Pick a root, then pick a quality.
The neck fills in with a playable position, and the row along the bottom fills with every other position the app worked out. Tap through them. Each one is a real shape for your instrument in its current tuning, not a picture from a book.
5. Look at the menu
Top right of the panel, the three lines. That is where everything else lives: “Instruments”, “Chord settings”, “Fixed view”, “Open Tuning”, “Left-Handed” and “Manage Bookmarks”.
The four icons to its left are the ones you reach for mid session: home, “Bookmark”, “Bookmarks” and “Chord AI”.
“Fixed view” is on out of the box. It locks the instrument pages to landscape and fits the whole neck on screen. Turn it off and the pages follow your phone, and the neck scrolls sideways at a fixed fret width instead.
6. One chord chart
Go back home and tap “Chord Charts”.
In the free version you land straight in a single chart. Tap a measure once to select it, tap it again to open the chord editor, build a chord, tap “VALIDATE”. Repeat until the chart says what you played, then use the export button in the top right to get a PDF.
Where to go next
Naming a chord you are playing is step 2 in full: the readings, the staff, and how to tell the app which chords you care about.
Looking a chord up by name is step 4 in full, including the builder for names the two rows cannot reach.